I have always enjoyed being crafty and creative since I was little. I have fun doing D.I.Y. projects, sewing, and having my ideas turned into a final product. Last summer while I was on a family vacation, my brother and I were walking on the beach. I just happened to look down at the right moment and dig out a sand dollar in perfect condition! I have never found a sand dollar before and I was super excited about it. I also thought of it as a sign of good luck.

I wanted to keep and preserve this sand dollar. I did some research online and found some great tips that helped me keep my sand dollar in great condition. In this post, I will explain how I preserved my sand dollar and how it is currently displayed.
After finding the sand dollar I let in dry out in the sun on the deck. I would bring it in at night, but I left it in the sun for a few days to make sure it was completely dried out. When it was time for us to go home, I packed the sand dollar around some paper towels in a small container. I kept this container in my purse so I could keep an eye on it.
Once we were home I soaked my sand dollar in a mixture of bleach and water. Here are some links I used to help me do this:
http://www.ehow.com/how_8199819_clean-sand-dollars.html
http://www.wikihow.com/Clean-and-Preserve-Sand-Dollars
Soaking the sand dollar in bleach cleans out anything that might be left inside it that could cause it to smell rancid. I did not soak it for very long because the longer you soak it, the more fragile it becomes.
After soaking the sand dollar I let it dry outside in the sun again. Once it had been dry for a few days I painted the sand dollar with a mixture of white Elmer’s glue and water. This keeps your sand dollar hard and white. The links I posted above also include how to do this step.
I painted one side of the sand dollar and let it dry on a piece of wax paper. After one side was dry I did the same thing to the other side.
Since my sand dollar was now well-preserved, I knew I wanted to frame it. It took me awhile to frame it because I was not quite sure how to go about doing this. I had some ideas in my head and I did some research online about it but could not exactly find what I wanted.
I wanted to get this project going so I went to a craft store and bought a 5X7 shadow box frame. I knew I wanted a shadow box so the sand dollar would fit in the frame, and I knew I did not want a huge frame. After tossing a few ideas around in my head on how to frame this, I went to Michaels to see if they had any strong matte paper for this frame. I talked to one of the employees there and told him my ideas and what I was framing. He gave me this fantastic idea that was way better than what I was trying to do! I thanked him very much and decided to use his idea and make it my own. If you are ever stuck with a craft project I would definitely try discussing your project and ideas with an employee at a craft store. A lot of them create things themselves and might give you some insight on your project.
I purchased a 5X7 pre-cut double mat for my shadow box frame. After purchasing the mat for the frame, I had everything else I needed to complete this project at home.
Here are the supplies I used to frame this sand dollar:
1. A sand dollar that is already cleaned and preserved
2. A shadow box of whatever size and color you want. Just make sure it is big enough for the sand dollar. I used a 5X7.
3. Pre-cut mat that fits your frame.

4. Cardboard. You do not want this cardboard to be too thick. I used cardboard from the back of a note-pad. Cardboard from a cereal box would work as well.
5. Scissors
6. Hot glue gun
7. A marker that will show up on the cardboard
8. Sand. Can be from the beach or bought at the craft store
9. A glue stick that dries clear.
After I had all my supplies ready, I began framing my sand dollar.
First I plugged in my hot glue gun to heat up. While that was warming up I used the paper that came with the frame to help me cut out the correct size of cardboard. After the cardboard was cut to the proper size, I put my sand dollar on it to eye up the spot I wanted to glue it too. You could mark on the cardboard where you want to glue your sand dollar but I just eye-balled it.

After the hot glue gun was ready I put around six drops of glue on the back of the sand dollar. I put the glue all around the perimeter of the sand dollar but not too close to the edge. Then I placed my sand dollar onto the cardboard and held it there for a few seconds. I let it sit for a few minutes and then gently picked up the cardboard to make sure the sand dollar was glued to it. My sand dollar was secure so I continued with my project.

I wanted to write on the cardboard where my sand dollar was from and the date I found it. I had a bunch of these “Painty” markers in all different colors. These markers can be used on a bunch of different materials such as glass and pottery. A sharpie would probably work just as well on the cardboard. If you are going to write anything on your cardboard like I did, I would recommend testing out the marker on a scrap piece of cardboard that you have left over from when you cut the cardboard to size. This way you are testing the marker on the exact same piece of cardboard.
I tested a bunch of colors that I liked but this Tropic Blue marker was the only one that showed up vivid and bright. Definitely, test your markers to see how they will show up before writing on your project!
After you have your marker picked out, lay your pre-cut mat on the cardboard. This shows you how your sand dollar will look once it is framed. This also shows you where you can write without your writing getting cut off. You can leave your pre-cut mat on the cardboard while writing or you could mark the safe areas to write with a pencil.
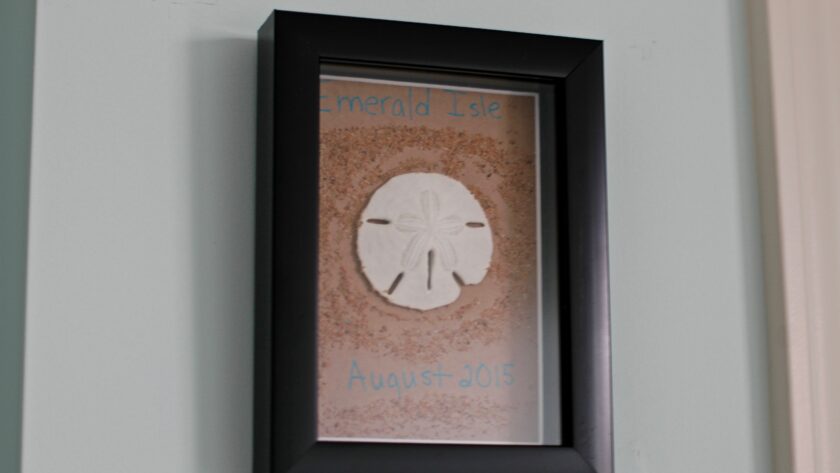
Above my sand dollar, I wrote Emerald Isle which was the beach I found my sand dollar on. Below the sand dollar, I wrote the month and year I found it. After writing this out it was time to decorate the cardboard with some sand.

I already had some sand at home from another project I did a few years ago. Click here to check out my other D.I.Y. post that I used this sand for. I put some of that sand on a piece of wax paper. I also put a piece of paper under my cardboard to collect any sand that might not stick to the cardboard. After I had my sand ready, I took my dry clear glue stick and put glue all around the sand dollar and writing. Next, I sprinkled the sand from the wax paper onto the cardboard.


Once I put the sand all over the cardboard I picked it up to get any excess sand off of my project. There were a few spots I wanted to fill in with more sand, so I repeated the glue and sprinkling sand process. After I had the sand glued where I wanted it, I pick up the cardboard to get the excess amount of sand off.

I put the cardboard in the frame, secured the frame shut, and now the sand dollar is ready to be hung up! You can hang it up or display the frame on a shelf in your house. I chose to hang mine on a wall. Here is the final version of my project. My sand dollar and memories from Emerald Isle are now framed and hung up where I can see it every day!


-Caroline 🙂
Sun, Surf, and Sand Dollars